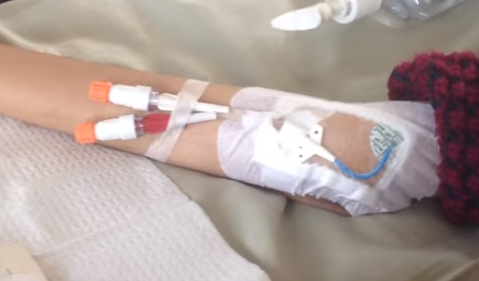
Central Line Blood Draw
Central lines are IV’s which allow medications to be given into large veins in the body, or to draw blood for lab work. Flushing a central line requires saline flushes and alcohol pads. Depending on the line, the doctor may want your line to get heparin, an anticoagulant, to prevent the line from clotting off.
Demonstration Videos
Guidelines
Blood Draw Procedures – Quick Reference
Central Line or PICC Procedures
PURPOSE
To draw blood from a central line catheter for diagnostic tests.
POLICY
1. Blood draws via a central line catheter (PICC, subclavian, tunneled) require a written physician’s order.
2. Peripheral-midline catheters should not be used for routine blood drawing.
3. Blood draws via central line catheters may be performed only by RNs trained in central line.
4. This procedure shall be done using aseptic technique.
5. Protective gloves shall be worn during this procedure and consideration given to wearing goggles.
6. Place a new primed needleless connector and extension tubing on the catheter after the blood draw, or follow manufacturer recommendations.
7. Erroneous lab values have been reported on blood specimens obtained from central catheters. If the lab values are significantly altered in a previously stable
patient, the lab test should be repeated.
8. When drawing blood samples from catheters with more than one lumen, all infusions being administered through the catheter should be stopped for a full
minute prior to obtaining the blood sample.
9. Prior to blood draws from patients on continuous infusions of TPN, the infusion shall be stopped for one full minute and the catheter must be flushed
with 20ml of 0.9% sodium chloride (USP), using 2 10ml syringes.
10. For neonate and pediatric patients and those requiring frequent phlebotomy, the amount of blood obtained for laboratory tests (including discard or waste volume) should be documented in the patient’s medical record.
EQUIPMENT
Liquid (regular or antimicrobial) soap and sanitizing gel
1 pair of gloves
3-4 alcohol swabs or other disinfectant product
2 10ml pre-filled syringes with 0.9% sodium chloride (USP)
1 10ml syringe for discard
Syringes of appropriate size for amount of blood to be drawn, or Vacutainer® blood draw device
10ml syringe filled with 3-5ml of heparin flush (10 unit/ml or as prescribed by the physician – not required for valved catheters)
Needleless connector and extension tubing (primed with 0.9% sodium chloride)
Labeled blood collection tubes
Safety transfer device
Sharps container
Goggles
30ml vial of 0.9% sodium chloride (if not using pre-filled syringes)
Occlusion clamp, if needed
PROCEDURE
1. Obtain physician order for lab draw. Explain procedure to patient.
2. Put on goggles, if appropriate.
3. Wash hands thoroughly with soap and water and dry with clean paper towel.
4. Arrange supplies on a clean surface.
5. Turn off all solutions infusing for one full minute (if applicable).
6. Put on gloves. Prime new needleless connector and extension tubing.
7. Cleanse needleless connector with 3 alcohol swabs, wiping for one full minute.
8. Attach blood draw device or syringe to needleless connector and aspirate 5ml of blood and discard.
9. Exceptions to discard are:
a. drawing blood cultures, in which case the first sample of blood is sent to the lab for analysis
b. drawing blood from neutropenic patients or infants, when it is essential to minimize blood loss. Follow specific physician’s order.
10. Attach a new syringe (or tube to Vacutainer®) and aspirate the total amount of blood required.
11. Fill appropriate tubes with blood, doing coagulation studies last, if ordered. If using a syringe to transfer blood into tubes, use a safety transfer device. If blood flow is slow or stops:
a. change the blood collecting tube
b. change the Vacutainer® device
c. flush lumen with 5-10ml of sodium chloride (USP)
d. have patient change position, place in Trendelenburg position, or have the patient cough with hands held over the head
12. For hub to hub technique:
a. cleanse the catheter/needleless connector junction with 3 alcohol swabs, wiping for one full minute, or use other appropriate disinfectant. Clamp
the catheter (unless it is a Groshong®) and remove the needleless connector.
b. luer lock a 10ml syringe onto the catheter hub
c. release the clamp and aspirate 5ml of blood into the syringe; clamp the catheter (if applicable), remove the syringe and discard
d. attach the syringe for drawing the blood sample, release the clamp (if applicable) and aspirate the total amount of blood required for the tests
13. Flush the catheter with 10ml of 0.9% sodium chloride. Repeat using second 10ml syringe of sodium chloride, if appropriate. (This may be done after the new primed needleless connector and extension tubing have been attached to the catheter).
14. Attach a new primed needleless connector and extension tubing to the catheter.
15. Attach a transfer safety device to the syringe containing blood for tests and allow the vacuum to draw blood into the tube while directing flow toward the wall of the tube.
16. Label the tubes and transport to the lab per specific laboratory requirements and Infection/Exposure Prevention policies and procedures.
17. Document the procedure in the patient’s medical record.
- Access the catheter as outlined above, maintaining aseptic technique.
- Remove the first 3-5 mL of blood and discard.
- Obtain specimen.
- Flush with 10-20 mL of normal saline (clamping the catheter as flushing is completed, if necessary) and promptly dispose of used syringe(s).
- Perform hand hygiene when done.
Related Devices
Catheter & Central Line Management Instructions
Instructions for Catheter Management: Video demonstrations User manuals & important Read more...
Central-line-or-picc-line-dressing-change
Central Line Dressing Change A central line (PICC, port, Read more...
How to prepare and administer TPN Instructions
TPN Administered TPN administration into a vein, Read more...
Flushing a port a cath Instructions
Flushing a Port a Cath Normal saline is used Read more...
Dressing Change & Flush Port-a-Cath Instructions
Dressing Change & Flush Port-a-Cath A port-a-cath is a Read more...
Access Port-a-cath Instructions
Port-a-cath A port-a-cath, also referred to as Read more...