Access Port-a-cath
Port-a-cath
A port-a-cath, also referred to as a port, is an implanted device which allows easy access to a patient’s veins. A port-a-cath is surgically-inserted completely beneath the skin and consists of two parts – the portal and the catheter.
The portal is typically made from a silicone bubble and appears as a small bump under the skin. The portal, made of special self-sealing silicone, can be punctured by a needle repeatedly before the strength of the material is compromised. Its design contributes to a very low risk of infection. The slender, plastic catheter attached to the portal is threaded into a central vein (usually the jugular vein, subclavian vein, or the superior vena cava).

Demonstration Videos
Guidelines, Specifications & User Manuals
Implantable Central Line Guidelines – Intermountain Healthcare
About Your Implanted Port
This information will teach you about the placement and care of your implanted port. An implanted port is a type of central venous catheter (CVC).
An implanted port (also known as a “port”) is a flexible tube that’s placed into a vein in your chest. It will make it easier for your healthcare team to:
- Give you intravenous (IV, through a vein) medication.
- Give you IV fluids.
- Take blood samples.
- Give you medications continuously for several days. Sometimes medications must be given in a vein larger than the ones in your arms. The port lets the medication go into your bloodstream through a large vein near your heart.
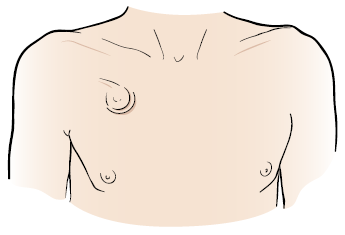
Implanted ports are usually placed about 1 inch (2.5 centimeters) below the center of your right collarbone (see Figure 1). If you wear a bra, your implanted port will be about 1 inch from where your bra strap lies.

Figure 1. Port location
Implanted ports can stay in place for years. Your doctor will remove your port when you don’t need it anymore.
Types of implanted ports
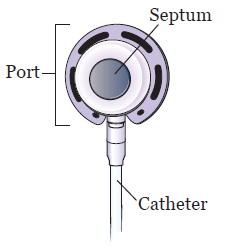
All implanted ports are made up of 2 parts: the port with a septum and a catheter (see Figure 2).
- The port is the starting point of fluid flow through the catheter. It sits under your skin and has a raised center called a septum. The septum is made from a self-sealing rubber material. This is the part of the port where needles will be placed. This is also called the access point.
- The catheter is a small, plastic, flexible tube. One end of the catheter is connected to the port, and the other end sits in a large vein near your heart.

Figure 2. Parts of your port
There are 2 types of implanted ports:
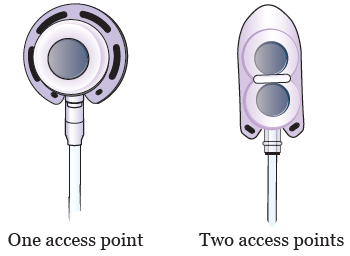
- A single lumen port is a port with 1 access point (see Figure 3). Most people will get a single lumen port.
- A double lumen port is a port with 2 access points (see Figure 3). You can put a needle in each access point. Double lumen ports are used for people that regularly need more than 1 point of access.

Figure 3. Single and double lumen ports
Most implanted ports will be the size of a nickel or a quarter. They can be circular, oval, or triangle shaped. Your doctor will choose the one that’s best for you and your treatments. Your port may be called a BardPort®, a Mediport®, a PowerPort®, or a Port-A-Cath®.
Power-injectable ports
Most implanted ports are made to be used during imaging tests, such as computed tomography (CT) scans or magnetic resonance imaging (MRI), to allow for high speed injections (shots) of contrast. These implanted ports are called power-injectable ports.
When you have your implanted port placed, your nurse will let you know if you have a power-injectable port. They will also give you a wallet card with information about your implanted port. You should carry it with you at all times.
Accessing your implanted port
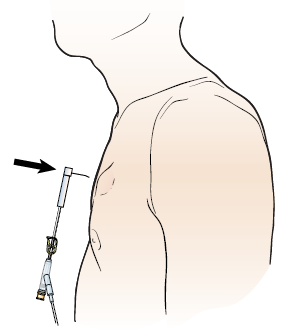
When you need IV fluids or medication, your nurse will place a needle through the access point on your implanted port. This is called accessing your port (see Figure 4). The fluid or medication will move from your implanted port through the catheter and into your bloodstream.
Don’t let anyone who isn’t trained in port access to access your port.

Figure 4. Accessing your port
Back to top
About Your Implanted Port Placement
Before your procedure
Before you have your implanted port placed, tell your doctor if you’re allergic to a medication called heparin. Heparin prevents blood clots from forming. If you’re allergic to heparin, you will need a special type of port.
Your port will be placed either in Interventional Radiology or in the operating room. Port placement is a short procedure. Your doctor or nurse will tell you how to prepare for it.
Before the procedure, you will have an IV line placed in your arm. You will get medication through your IV that will make you feel drowsy. The medication will control pain and anxiety.
During your procedure
The area where the implanted port will be placed will be cleaned and numbed with local anesthetic (medication that numbs an area of your body). You will be given local anesthetic in 2 places, your neck and your chest.
A small incision (surgical cut) will be made at the base of your neck. A second incision will be made on your chest, under your collarbone. The catheter will be placed through the second incision, tunneled under your skin to the first incision, and threaded into your vein.
Your incisions will be closed with either sutures (stitches) or surgical glue called Dermabond®. If you have sutures, they will be absorbed and won’t need to be removed.
After your procedure
You may have some discomfort at your incision sites and where the catheter was tunneled under your skin. This pain should get better in 24 to 48 hours. You can take over-the-counter pain medication (medication you get without a prescription) if you need it. Most people don’t need prescription pain medication.
If your port will be used the day it’s placed, your doctor will insert an access needle into the septum during your port placement. The needle and port will be covered by a bandage (dressing). There will also be a small bandage over the top incision.
Caring for your incision site
If your incisions were closed with sutures:
- You will have 2 small bandages covering your incision.
- Leave your bandages in place for 48 hours, or as long as your doctor tells you to.
- Don’t get your bandages wet. You can shower once your bandages are removed.
- Wearing a seatbelt may put pressure on your incisions. You can put a small pillow or folded towel between the strap and your body to help with this.
- For 3 to 5 days after your implanted port is placed, don’t lift anything heavier than 10 pounds (4.5 kilograms).
If your incisions were closed with Dermabond:
- You may have small pieces of tape or bandages covering the incisions.
- Don’t apply lotion or place adhesive on top of the tape or bandage.
- Don’t pick or scratch the Dermabond. It will come off on its own.
- Wearing a seatbelt may put pressure on your incisions. You can put a small pillow or folded towel between the strap and your body to help with this.
- For 3 to 5 days after your implanted port is placed, don’t lift anything heavier than 10 pounds (4.5 kilograms).
After your incision heals
Once your incision heals, you can return to your normal daily activities, such as household tasks, job responsibilities, and exercise. You can swim with your implanted port as long as there is no needle in place. Don’t play any contact sports, such as football or rugby.
Your implanted port may raise your skin about ½ an inch (1.2 centimeters). You may be able to feel it through your skin, but you probably won’t be able to see it when you wear a V-neck shirt. Most people won’t know that you have it.
The skin over your implanted port doesn’t need any special care. You can wash it as you normally would.
When your implanted port is being used, you will have a see-through bandage over the needle. The bandage must be kept dry and in place while the needle is in the port. You don’t need a bandage over the implanted port when it’s not being used.
Your implanted port won’t set off metal detectors.
Flushing your implanted port
Your implanted port will need to be flushed by a nurse every 4 weeks when it’s not being used. This is done to make sure the catheter doesn’t become blocked. If it becomes blocked, it may not work anymore and it may have to be removed.
Similar Instructions

